Available starting April 7, 2026. After updating the Appointments module on your workspace, the functionality described here in this article will replace the one currently described in the How to use the Appointments module article.
Collecting availability at congresses can be repetitive and time-consuming, creating friction for both KOLs and planners. Invitees are often asked to share their availability multiple times, and meeting requests may not always account for key participants’ schedules upfront, leading to unnecessary back-and-forth.
To address this, we’ve optimized how availability is captured and used. It can now be collected once for the entire congress and reused across one or multiple meeting requests. If a participant has already shared their availability, meetings can be scheduled instantly without requesting it again.
Planners can also mark participants as “required.” Their congress availability is used first to generate time slots for others, ensuring meetings align with key attendees’ schedules while reducing coordination effort and speeding up scheduling.
In this article we'll explain how planners capture and leverage the availability of attendees to facilitate scheduling meetings:
Capturing, managing and storing a participant’s availability
Using meeting requests to capture availability before scheduling meetings
1 - Overview of how meeting requests work
2 - Adjust the date and time period during which invitees can provide their overall availability for
3 - Adding “Required” or non-required participants to a meeting request
What are the criteria that determine the meeting request availability slots that attendees can choose from?
How to create a meeting request?
Sending the meeting request and receiving responses
What emails are used by meeting requests?
How can I edit the look and feel of the meeting request form?
Capturing, managing and storing a participant’s availability
During conventions, meeting planners will need to have as much information as possible in order to be able to efficiently schedule meetings and to maximize turnouts.
Planners will for example need to know which KOLs to set up meetings with, which representatives or organizers will meet with them, and what is the availability of the organizers and the KOLs.
This information can be captured:
-
Via a list of desired meetings (“meeting requests”) to be set-up, received by the meeting planner from an organization and/or its reps. For example, a pharmaceutical organization’s reps will add meeting request information for a congress into their CRM, which is then imported into Backstage.
- By reaching out directly to participants in order to capture their availability for meetings throughout the entire congress/trade show. This can be accomplished by sending out requests to share availability, via email, from Backstage, so that participants can provide their availability, and it can be captured in Backstage.
Whether you are adding the user availability for a given person for the event into Backstage, or capturing it by sending out availability requests to your attendees, you can at any time access and edit the overall user availability.
This is true for attendees on the workspace user list, and the external participants.
To see the availability that was captured for an attendee, go to their user details via the Users list or the External participants list, and refer to the Availability section.
Here you can see the overall user availability that was provided. There are also two actions that can be performed here:
Copy a link to the overall user availability form. This can allow planners to easily share a direct link to the availability calendar form with the attendee.
Update availability:
Manually add the availability of the attendee, based on information you have received.
Request availability:
Clicking this button will send a request to share availability to the attendee via email, so they can provide their overall availability for the event.
Using meeting requests to capture availability before scheduling meetings
1 - Overview of how meeting requests work
In order to manage meeting requests when using the Appointments module, a new Meetings request tab has been added to the Interactivity section of the workspace main menu:
This tab is available only when using the Appointments module.
The purpose of meeting requests is to capture the availability of KOLs and/or internal stakeholders in a single stroke, for the entire congress, and to store this information in Backstage for each user, including external participants.
The provided user availability for the full event is then leveraged for converting meeting requests into scheduled meetings.
Please see below a break-down of how meeting requests will work. This takes into consideration the following factors:
- If the overall user availability has already been captured for an invitee.
- If the meeting request includes required participants or not.
If the meeting request only includes non-required participants:
Non required attendees only:
→ If the overall user availability has already been captured for an attendee, via a meeting request form or by adding/importing it to Backstage, the attendee will not receive the email request to provide their availability. Their availability is already captured in Backstage. The meeting planner can directly choose the most suitable slot for the meeting invitation and schedule the meeting.
→ If overall availability has not already been captured for an attendee, via a meeting request form or by adding/importing it to Backstage, then the attendee will receive the user availability email and be able to provide the overall user availability. Once the overall user availability is captured, the meeting planner can choose the most suitable slot for the meeting invitation and schedule the meeting.
If the meeting request has required attendees:
Required attendee:
→ If the overall user availability has already been captured for a required attendee, via a user availability form or by adding/importing it to Backstage, the attendee will not receive the email request to provide their availability. Their availability is already captured in Backstage.
→ If the overall user availability has not already been captured for an attendee, via a user availability form or by adding/importing it to Backstage, the overall availability is only requested from required attendees (as a first step). Then, as part of a second step of the meeting request, the non-required participants will be requested to select their preferred availability slots based on the availability of the required attendees, combined with the availability of the organizer and the meeting room availability. Once all the availability slots are captured, the meeting planner can choose the most suitable slot for the meeting invitation and schedule the meeting.
Non-required attendee:
→ Overall availability is not requested from non-required attendees when sending a meeting request that includes required participants. The non-required participants will be requested to select their preferred availability slots based on the availability of the required attendees, combined with the availability of the organizer and the meeting room availability.
2 - Adjust the date and time period during which invitees can provide their overall availability for
The date and time range within which the attendees will be able to provide their overall availability should be set before planners start to capture the attendees’ availability for meetings.
It is by default based on the event start and end dates and times, however the time range can be modified if needed, using the options available at under Meeting request > Settings > User availability:
3 - Adding “Required” or non-required participants to a meeting request
Meeting planners can, if needed, mark certain specific participants as “required”. Required participants would be the participant that must be present at the meeting. It is therefore crucial that their availability is captured first and foremost, in order to suggest suitable slots for the meeting.
The approach for sending out a request to share availability will vary slightly depending on whether the meeting planner will make some of the participants “required” or not.
If you do not mark any participants as “required”, the request to share availability will be sent to all the participants for whom the planner has not yet collected their availability for the congress yet.
Once availability is received, the meeting planner can select the most suitable slots (based on the provided participant availability and room availability) for the meeting invitation.
If you mark one or more participants as “required”, the request to share availability will first be sent to all “required” participants. The “required” participants will share their availability first (unless it was already captured in Backstage).
Once the planner has received the required participants’ availability, they can then send out the request slot selections that include suitable time slots to all the remaining invitees.
At this point, the remaining participants will choose the slots that suit them, among those that the “required” attendees are available for, and combined with the availability of any selected meeting rooms.
3a/ Closer look at meeting requests without “required” participants
1 - The meeting planner will send a meeting request to allow all attendees to select availability that suits them for a meeting. This will send the participants an email with a link to a calendar form, where they can choose their availability during the congress/trade-show:
2 - Invitees choose their overall user availability. The date and time range they can choose from is by default based on the event start and end dates and times, and can be modified under Meeting request > Settings > User availability:
Three options are available on the form for attendees to choose from:
- Available at all times
- No availability
- Select specific date/time slots when invitee is available.
The participant can select their availability response and hit Submit.
3 - After the availability responses are received in Backstage, the planner can then choose the most suitable slot based on the captured availability.
Each slot shows how many participants are available for it, and when the planner clicks on a slot, the availability for that specific slot is indicated for each participant:
After selecting a slot that matches the availability of a maximum of the attendees. The planner can send out the meeting invitation by clicking on Schedule meeting.
Note: To avoid having to wait for all the attendees to answer, planners can also adjust the invited participant list (in the meeting request) so it includes only the participants who have provided their user availability, and send the meeting invitation to them.
3b/ Closer look at meeting requests with “required” participants
1 - The meeting planner can mark some of their participants as “required”:
2 - When at least one participant is marked as "required", the request user availability email is first sent to the required participants (unless their availability was already captured in Backstage).
The meeting planner can then click on Request user availability to send the request to capture availability only to the “required” participants:
3 - The meeting planner will see that the responses from the “required” participants are pending (yellow note), and that the required participants are marked as “Awaiting”. Until the responses are received, the planner cannot yet send the availability request to the “other” participants:
4 - Unless their availability is already captured in Backstage, the “required” participants will receive the email, and click on the link in order to access the calendar form, where they can indicate their overall availability:
5 - As the “required” attendees respond, the planner can see in Backstage that they are marked as “Availability provided”:
Meeting planners can also view the availability of the “required” attendee after they have responded, by clicking on the three dot’s icons next to their name, and on “Preview user availability”:
6 - Once the planner has received the responses from the “required” participants (and they consider that they have received enough responses), they can send the meeting request on to the “other” participants, by again clicking on Request slot selection.
The “other” participants will then receive the request slot selection email with the link to the calendar form, and they will be able to choose among the slots that are displayed as available:
The available slots will be the ones that the “required” participants are available for (and that they selected previously) combined with the availability of the organizer and the remaining availability of the meeting rooms.
7 - Once all participants have responded by providing their availability slots, the meeting planner can create the meeting invitation, by choosing the most suitable slot for the meeting based on the captured availability.
In Backstage the planner will see each slot, as well as how many participants are available for it. When the planner selects a slot, the availability for that slot for each participant is indicated:
They can then schedule the meeting (send out the meeting invitation), by clicking on Schedule meeting.
What are the criteria that determine the meeting request availability slots that attendees can choose from?
For the overall availability request:
The event’s start and end date and time, by default, or (if modified) the start and end dates and times configured under Meeting request > Settings > User availability.
Note: The Default meeting suggested start date and time for the event, per the selection in the Settings > Schedule rules section, is not taken into consideration.
For the slot selection request:
- The availability of the meeting request representative (organizer). The time slots when the organizer is not available (based on their existing meetings) are not listed in the form.
- The availability of “required participants”, if relevant.
- The availability of meeting room. Based on any specified times when the selected room is available, room capacity, and taking into consideration if the room is already booked or not.
- The meeting request duration, as specified in the meeting request.
How to create a meeting request
Before creating a meeting request, keep in mind that the date and time range within which the participants can choose their availability for, is by default based on the event start and end dates and times, but can also be modified under Meeting request > Settings > User availability.
To create a meeting request, select the New meeting request button and fill in the below information for the meeting:
Title
Title of the meeting request.
Description
This is optional, and can be used to add more details to the meeting request.
Duration
Use the dropdown to select the duration of the meeting. The possible duration values are based on the meeting duration settings configured in Settings > Duration.
Representative (organizer)
Use the dropdown to select the app user/representative that the meeting is organized on behalf of.
Participants
Use the dropdown to select the participants (internal and external) that the meeting request will be sent to via email.
Optional: Mark participants as required or not
If you mark one or more attendees as “required”, the request to share availability will first be sent to all “required” participants (unless they’ve already provided their availability for the congress or trade show). Find out more about how using required attendees works
Once you have completed the above fields for the meeting request, you can hit Save. This will take you to the meeting request list, and mark the saved meeting request with “draft” status.
Sending the meeting request and receiving responses
The meeting request, once created, is ready to be sent to the participants. Click on Request user availability to send the request:
At this point, once sent out, the meeting request will look as follows:
To the right, you can see the meeting request status, i.e the number of attendees whose responses have not yet been received:
To find out exactly what attendees will receive the meeting request emails, please refer to the Overview of how meeting requests work section.
Until the participants have responded with their availability, the planner cannot yet select any meeting slots or click on Schedule meeting.
Once responses have been received from the attendees, the proposed suitable time slots will become visible based on the attendee availability:
From here, the planner can select the most suitable slot for all attendees, and send an actual meeting invitation by clicking on Schedule meeting:
What emails are used by meeting requests?
The email templates in the workspace that are used for the meeting requests emails can be configured via the Meeting requests > Settings > Communications section:
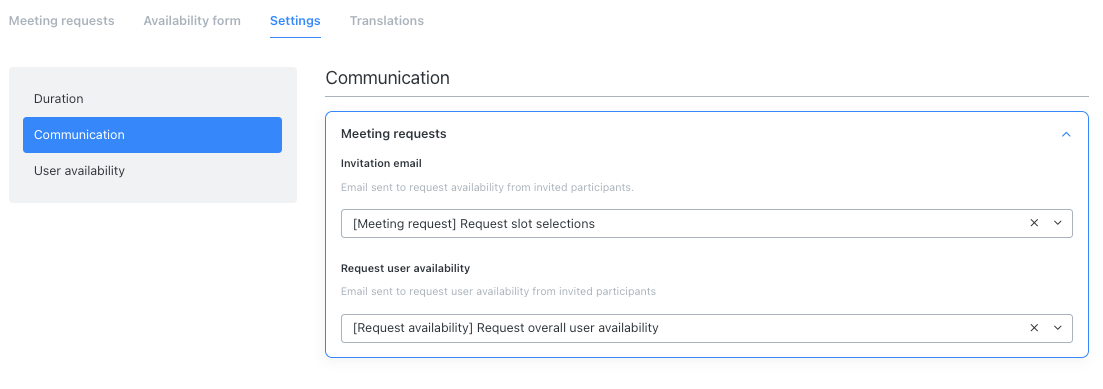
Request user availability & Slot selection emails
Participants that are added to a meeting request will receive an email containing a link to a form for them to provide their availability.
There are two distinct emails that are used to invite attendees to provide their availability, depending on the context.
Request overall user availability:
The default template is {Request availability}: Request overall availability
This email is used to request the overall user availability for the full event. It is typically sent to the required attendees and the other attendees, and links to the calendar form where attendees can enter their overall availability:
Here the attendees can select the date and time ranges during the event that they will be available for meetings to be scheduled.
Request slot selection email:
Default template is {Request availability}: Request slot selections
This email is used to request that the users share their availability for a given meeting request, by choosing slots based on the availability shared by the required participants, availability of the meeting organizer and the availability of the the meeting rooms:
Here the attendee can see the meeting duration, the number of total participants (including themself), and whether the participants have already answered or not.
More importantly, they can choose their availability response for this meeting request. They can select
- No suitable availability
- Available at all times
- Select the specific date and time slots that will fit their schedule. The participant can select as many slots as they like.
Once they have made their choice, the participant can select Submit in order to send their meeting request response to the meeting planner.
Meeting request reminders
Meeting planners can send reminder emails to encourage participants to respond to meeting requests:
Default template is {Request availability}: Reminder
How can I edit the look and feel of the meeting request form?
The look of the two forms used by invitees to provide their availability (Meeting request slots and User availability) can be customized based on your needs, so they match the branding or identity of the organization or event app.
This is done via the Availability form tab:
Here the Backstage user can choose:
- A primary color that is used for the selected time slots and the button background.
- A button text color that will be used for the color of the text in the buttons.
- A Background image that can be uploaded and used for the background of the form.
Accepted files types are PNG or JPEG, with a maximum file size of 10MB.
Recommended resolution is 1920x720px.
The Backstage user can see how the forms will look as they make changes, by choosing between the Meeting request slots and User availability tabs:
Comments
0 comments
Please sign in to leave a comment.